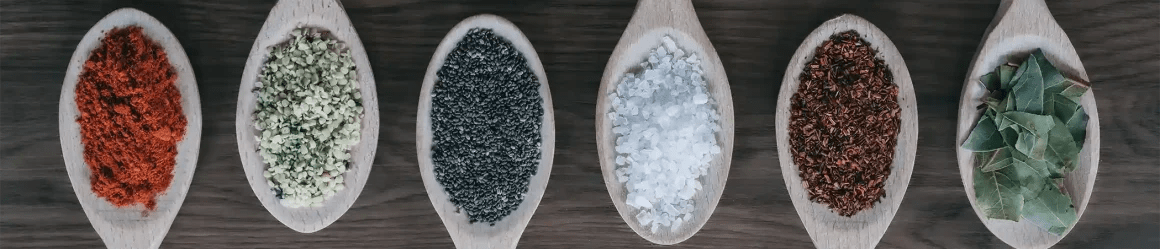
Today was one of those wonderfully chaotic days — timers beeping, mixers humming, flour floating through the air (not to mention the mishap with my Instapot, but that’s a story for another time), and yes, coffee very much in hand. ☕️ Ya’ll know I have to have my coffee!
Between stacks of mixing bowls and a slightly insane kitchen, I’ve been working on some truly delicious things: think fluffy chocolate chip pancakes, summery strawberry, blueberry & peach jam, and soft, golden loaves of white sandwich bread fresh from the oven. 🍫🥞🍓🍑🍞
It’s a little messy behind the scenes, but that’s where the magic happens — and I can’t wait to share it all with you soon ❤️ PS – I added some pictures of what is on the way!
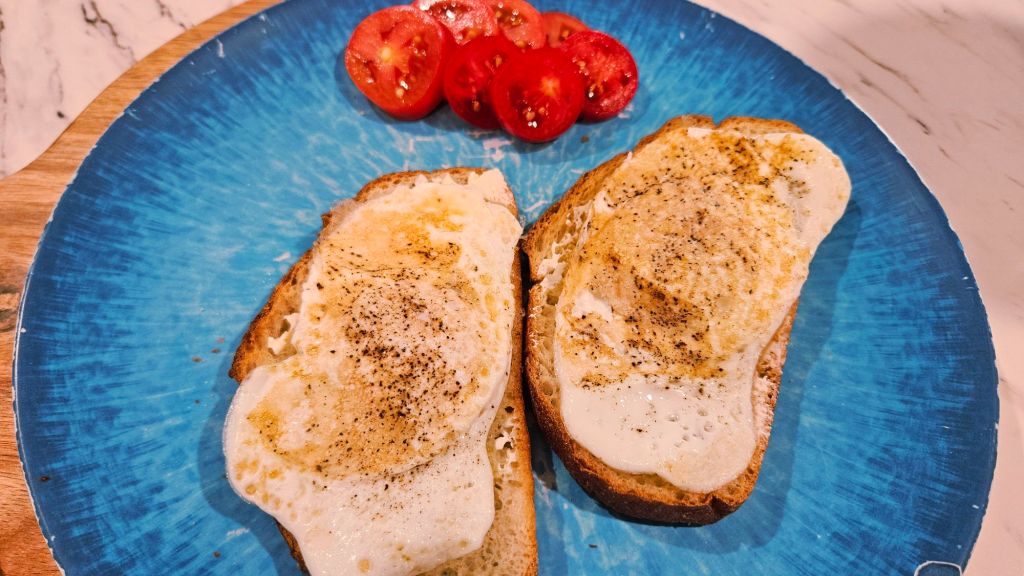
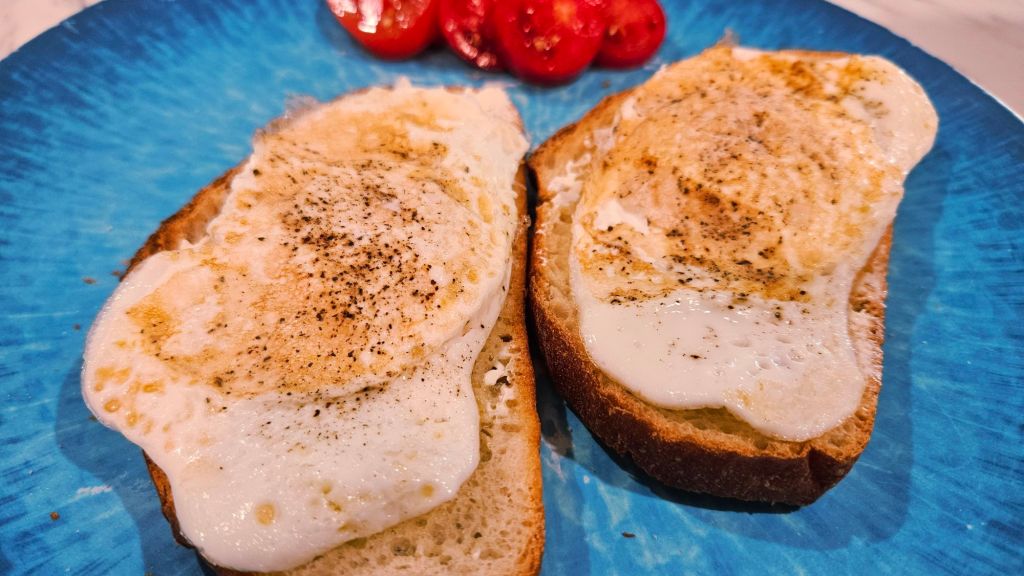
There’s something so comforting about a simple lunch of eggs over easy on toast. The golden yolk, just runny enough to spill over the warm, crispy bread, creates the perfect balance of richness and crunch. It’s a humble meal, yet it feels like a little moment of luxury in the middle of the day—quick to make, deeply satisfying, and always cozy. I even added some tomatoes from my garden!
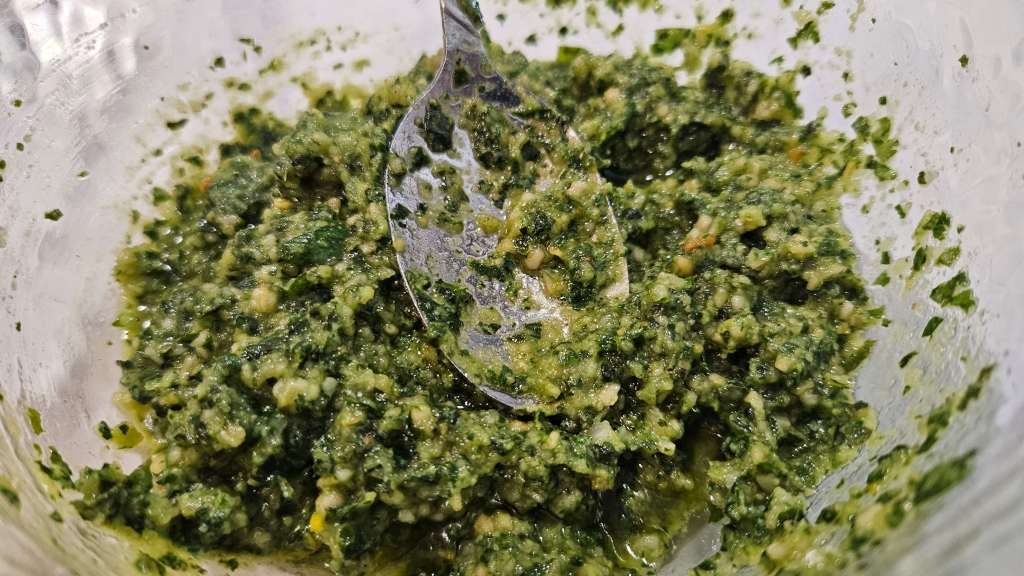
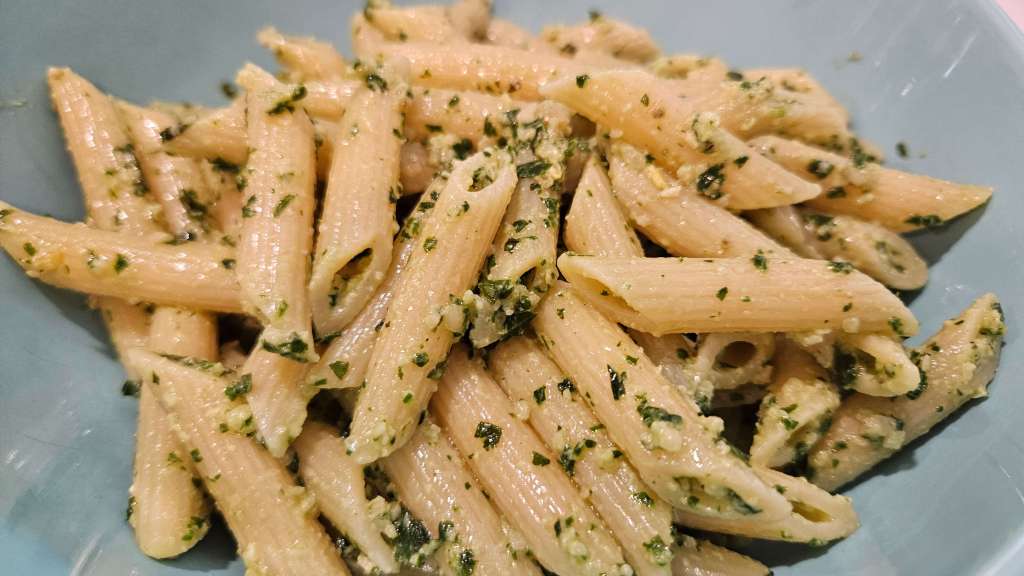
There’s something deeply satisfying about stepping into your backyard, brushing your fingers through a tangle of basil leaves, and harvesting the ingredients for your next meal. Homemade pesto is one of those simple pleasures that turns fresh, everyday ingredients into something extraordinary. With just a handful of garden-fresh basil, a clove or two of garlic, toasted pine nuts, a good amount of olive oil, and a sprinkle of Parmesan, you can create a vibrant, aromatic sauce that elevates everything from pasta and sandwiches to grilled veggies and even some nice bread. You can find my recipe for that here.
This is my favorite way to make pesto—simple, fresh, and bursting with flavor. Whether you’re swimming in basil from a thriving garden or just picked up a bunch from the farmers market, this recipe is a delicious way to put it to good use. It’s quick to make, easy to tweak, and endlessly versatile.
Ingredients:
2 cups fresh basil leaves (packed) (Or more if you love Basil, like me!)
1/2 cup grated Parmesan cheese
1/2 cup extra virgin olive oil
1 cup pine nuts (toasted)
3 garlic cloves
Salt and freshly ground black pepper, to taste
A squeeze of fresh lemon juice for brightness
Instructions: Toast the nuts (optional but recommended): In a dry skillet over medium heat, toast the pine nuts for 2–3 minutes, stirring often, until golden and fragrant. Let them cool slightly.
Blend the base: In a food processor or high-powered blender, combine the basil leaves, garlic, and toasted nuts. Pulse until the mixture is coarsely chopped.
Add cheese: Add the grated Parmesan and pulse a few more times to combine.
Stream in the oil: With the processor running on low, slowly pour in the olive oil until the pesto reaches your desired consistency—smooth but still a bit textured. You may need to scrape down the sides once or twice.
Season to taste: Add salt, pepper, and lemon juice (if using) to taste. Give it one final blend.
Use or store: Use immediately, or transfer to a jar. To store, cover the surface with a thin layer of olive oil to prevent browning and refrigerate for up to 5 days. You can also freeze pesto in ice cube trays for easy, single-serving portions.
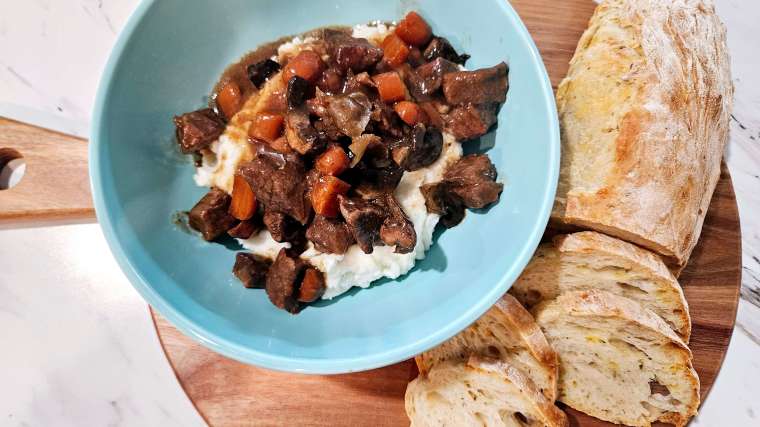
Imagine sinking your fork into a tender, melt-in-your-mouth Mississippi pot roast, the rich, savory aroma filling the air as the juices soak into every fiber of the beef. The roast, slow-cooked to perfection, is bathed in a flavorful gravy made from a magical combination of ranch seasoning, au jus, vegetables, and pepperoncini, giving it a tangy yet hearty bite that’ll make your taste buds sing. And the best part? You’ve got a warm, fluffy loaf of homemade bread (recipe here) to sop up every last drop of that luscious sauce. Each bite is a symphony of comfort, with the pillowy bread acting as the perfect companion to the succulent roast. This meal isn’t just food; it’s a hug for your soul.
Ingredients:
3-4 lb. Beef chuck roast (boneless or bone-in)
1 packet ranch dressing mix (preferably the dry seasoning mix)
1 packet au jus gravy mix
3 Tbs. Unsalted butter
6-8 pepperoncini peppers (with some juice)
1/4 cup of the pepperoncini juice (or more to taste)
2 Carrots, cut into 1 inch pieces
1 lb mushrooms (your favorite ones) cut in quarters
Salt and pepper (to taste; I don’t use this since there are other seasonings)
Instructions:
Step 1: Prep the Roast
Season the Roast: Pat the beef chuck roast dry with paper towels. Season generously with salt and pepper on all sides.
Sear the Roast (Optional): Heat 1 tablespoon of olive oil in a large skillet over medium-high heat. Once hot, sear the roast on all sides (about 3-4 minutes per side) until it’s nicely browned. This step is optional but adds depth of flavor.
Step 2: Prepare the Slow Cooker
Place the seared (or raw) roast in the slow cooker.
Sprinkle the ranch dressing mix and au jus gravy mix evenly over the top of the roast.
Step 3: Add Butter and Peppers
Slice the butter into a few pieces and place them directly on top of the roast.
Scatter the pepperoncini peppers around the roast, and pour in about 1/4 cup of the pepperoncini juice. You can add more juice if you want a more tangy kick.
Step 4: Add Vegetables
Carrots: Arrange the baby carrots (or cut regular carrots) around the roast in the slow cooker.
Mushrooms: Add the sliced mushrooms on top of and around the roast as well. These will soak up all the savory flavors and tenderize perfectly as the roast cooks.
Step 5: Slow Cook the Roast
Cover the slow cooker and cook the roast on low for 7-8 hours or until the roast is fork-tender and can easily be shredded. If you’re in a time crunch, cook on high for about 4-5 hours. The vegetables should be tender and infused with all the delicious flavors.
Step 6: Shred the Roast
Once the roast is done, remove it from the slow cooker and place it on a large cutting board. Use two forks to shred the beef into bite-sized pieces.
Stir the remaining cooking juices in the slow cooker to combine the flavors from the ranch mix, au jus, butter, and pepperoncini juice.
Step 7: Return the Shredded Meat to the Slow Cooker
Add the shredded beef back into the slow cooker, stirring to coat the meat and vegetables in the rich gravy.
Step 8: Serve and Enjoy
Serve the Mississippi Pot Roast with carrots and mushrooms over mashed potatoes, rice, or alongside a warm loaf of homemade bread (Recipe here) The tender, juicy meat, savory vegetables, and rich gravy will make every bite a comforting delight.
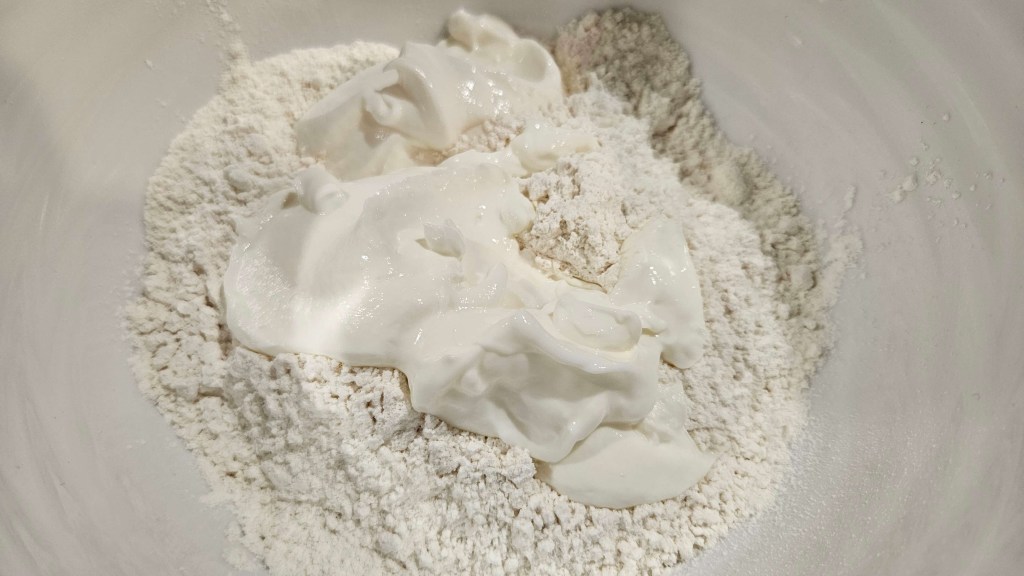
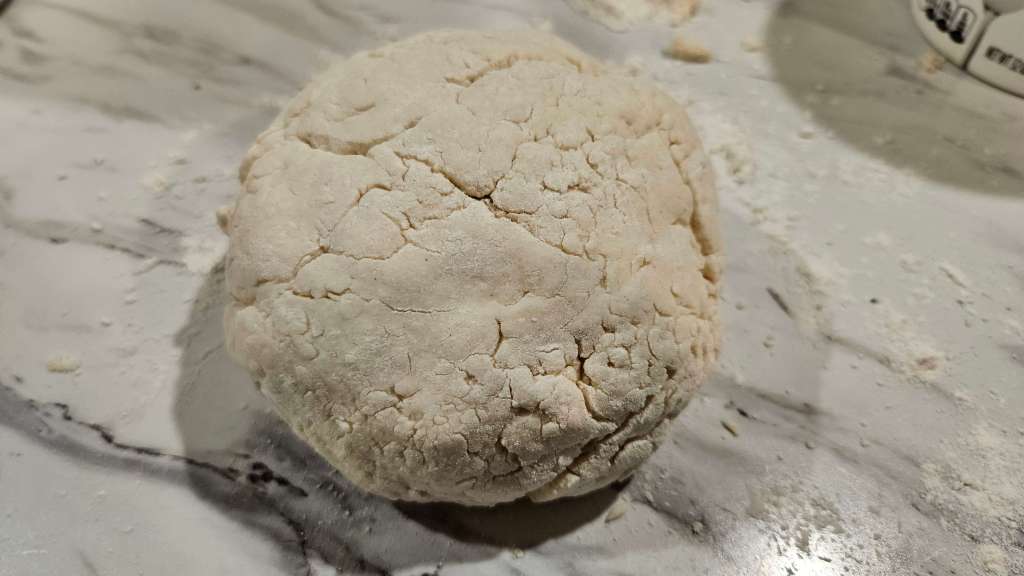
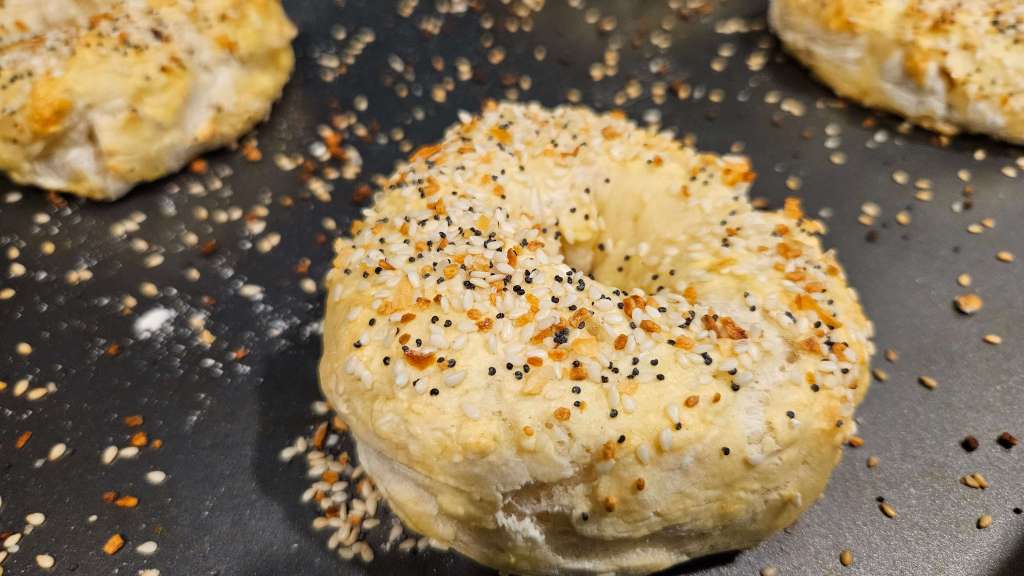
Easy and foolproof 2-ingredient bagel recipe made with Greek yogurt and flour – That is it!
Imagine biting into a warm, freshly baked bagel that’s perfectly golden on the outside and delightfully chewy on the inside – all made with just two simple ingredients! It sounds too good to be true, right? But with this easy, no-fuss recipe, you can create homemade bagels in a fraction of the time it takes to go to the bakery. No yeast, no fancy equipment, and no long hours of kneading—just two basic ingredients that come together to form a dough so simple, yet so satisfying. If you’ve ever wanted to enjoy the magic of homemade bagels without the hassle, this is the recipe for you!
Bagel ingredients:
1 ¼ Cups of Self Rising Flour
1 Cup Plain Greek Yogurt

Instructions:
1. Preheat the oven to 180C/350F. Line a baking tray with parchment paper and set aside.
2. In a large mixing bowl, combine your flour and Greek yogurt and mix well, until fully combined and a ball of dough remains.
3. Lightly grease a kitchen surface with extra flour. Place the ball of dough on top, and top with a little extra flour.
4. Slice into 4 even pieces.
5. Use your hands to roll the dough into a thin, sausage shape. Join both ends of the dough to form a bagel shape. Place on the lined tray and repeat until 4 bagels are formed. Lightly brush the tops of each bagel with either butter, egg, milk or water. Sprinkle the seeds on top. (Optional)
6. Bake the bagels for 22-25 minutes, or until golden brown. Remove from the oven and allow to cool completely.
Whether you enjoy them plain, with your favorite spread, or piled high with toppings, these bagels are a perfect reminder that sometimes the simplest recipes are the most rewarding. So the next time you’re craving a fresh, warm bagel but don’t have the time or patience for a complicated recipe, remember this easy two-ingredient trick—because homemade bagels have never been easier or more satisfying!
NOTES:
To store: Place cooked and cooled bagels in a ziplock bag. Bagels generally keep fresh for at least 5 days. You CAN keep them at room temperature, provided you eat them within 3 days.
To freeze: Either place bagels in ziplock bags individually or all of them together in one bigger bag. Frozen bagels will keep for 6 months.
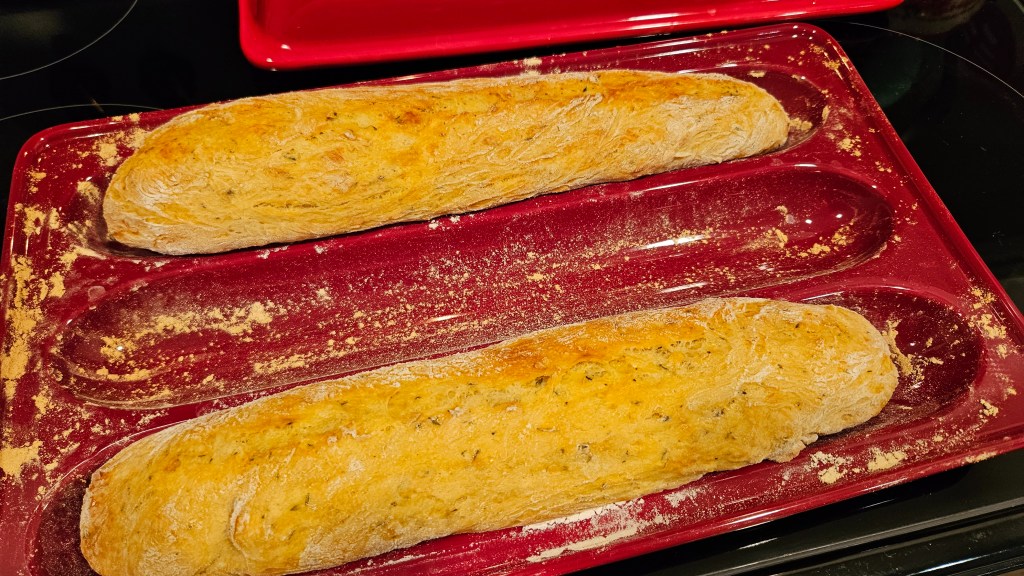
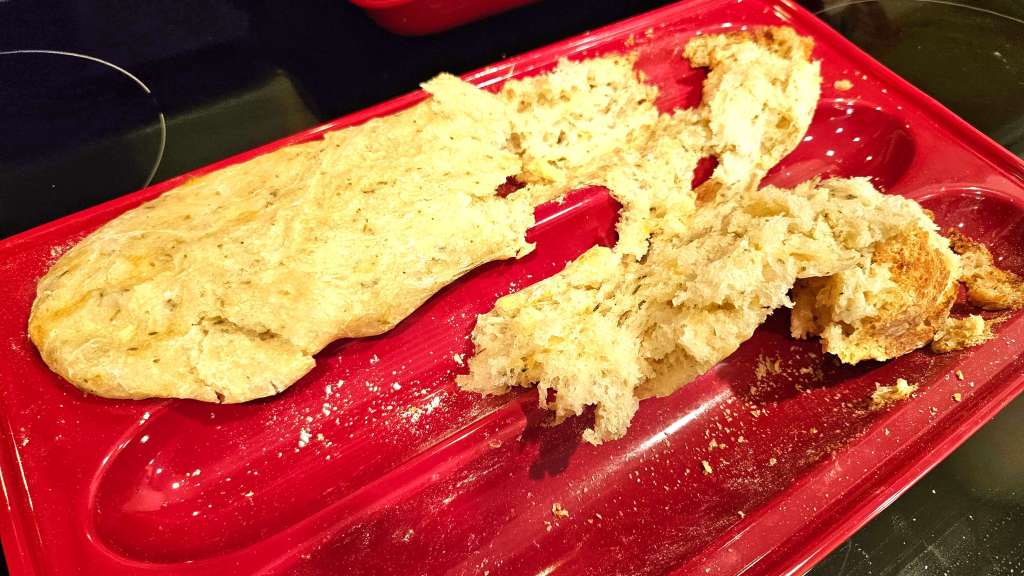
I’m sure some of you remember my post yesterday about the epic-fail bread in my new ceramic pan. Well, after starting my dough this morning and letting it sit all day, it was ready to be made!
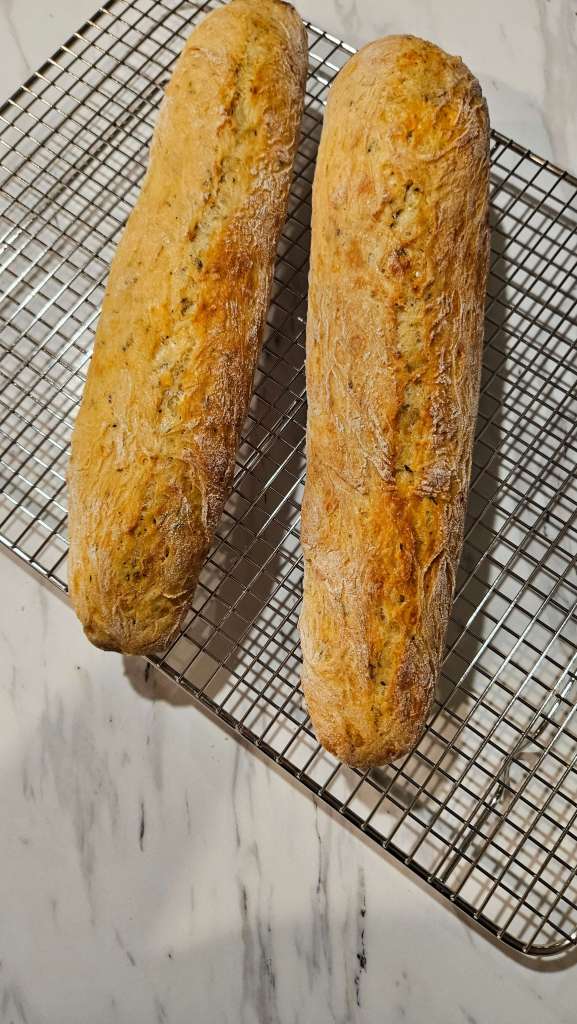
Well guys, here it is! Round 2 using this new ceramic pan. I must say, I made an ever so slight adjustment and wala perfection! See for yourself! I couldn’t be more happy with the outcome!
So, there I was, feeling like an absolute kitchen wizard. My new ceramic bread pan had arrived in all its pristine, glossy glory, and I was ready to bake the perfect loaf of bread. I had visions of golden-brown perfection, soft interiors, and an Instagram-worthy slice that would make my friends ask, “Who’s the baker behind this masterpiece?”
Spoiler alert: It wasn’t me, not today!
My excitement was palpable. I gathered my ingredients—flour, yeast, water, and the most important secret ingredient of all: optimism.
But here’s where the story takes a tragic turn: The ceramic bread pan.
I did everything the instructions said to do, to the T and I mean to the T! Because I had learned the hard way that bread and pans don’t always get along unless they’re properly prepared. I was sure I had done everything right. As I slid the dough into the pan, I thought to myself, “Look at this beautiful loaf. It’s going to be my best one yet!
I placed the pan in the oven, set the timer, and awaited my destiny. The smell of freshly baked bread filled the house, and I started to picture myself slicing through the crispy crust, butter slowly melting on each piece.
But, as all great kitchen disasters go, reality doesn’t always match the dream.
The timer beeped, and I pulled the bread out. The moment I tried to remove the loaf from the pan, I discovered the truth. The bread wasn’t coming out. It was stuck. Stuck like a bad first date. I tried gently coaxing it with a spatula, but it was like the dough had bonded with the ceramic in a way that was… permanent.
I tried running a knife around the edges, thinking I could free it, but no luck. At that moment, I realized I was staring at a loaf of bread that had officially become one with its ceramic home. It had decided to make this pan its permanent residence. I was the outsider here, trying to evict it. The dough had staged a full-on coup.
I resorted to using a spatula to literally scrape the loaf out. When I finally freed the bread (or what was left of it), it had a slightly tragic shape—more “abstract loaf” than “artisan bread.”
As I stood there, holding my sad, misshapen, slightly scorched loaf of bread, I realized one thing:
Ceramic bread pans are great… until they’re not.
Lesson learned: bread may rise, but sometimes it rises in the wrong places… like inside the ceramic pan you can never get it out of.
Chicken and wild rice soup is a hearty and comforting dish that combines tender pieces of chicken with the earthy flavors of wild rice, vegetables, and savory broth. This wholesome soup offers a perfect balance of textures and tastes, with the nuttiness of wild rice complementing the rich and flavorful broth. Packed with protein and healthy ingredients, it’s a satisfying and nourishing bowl of warmth, ideal for chilly days or whenever you crave a delicious, homemade soup.
Here are the Ingredients that you’ll need:
1 lb boneless, skinless chicken breasts, cut into bite-sized pieces
1 cup wild rice blend
1 small onion, diced
2 carrots, peeled and sliced
2 celery stalks, sliced
2 cups mushrooms, sliced
3 cloves garlic, minced
5 cups chicken broth
1/2 teaspoon dried thyme
1/2 teaspoon dried rosemary
1/2 teaspoon dried oregano
3 bay leafs
Salt and pepper to taste
1 cup heavy cream (for the thickener)
2 tablespoons Flour (for the thickener)
Instructions:
1. Add all ingredients (EXCEPT THE FLOUR & HEAVY CREAM) to the instant pot.
2. Pour in Broth
3. Stir to combine
4. Pressure Cook: Close the Instant Pot lid and set it to manual/pressure cook mode. Cook on high pressure for 15 minutes.
5. Natural Release: Allow the Instant Pot to release pressure naturally for about 10 minutes, then carefully perform a quick pressure release.
6. Mix the flour and the heavy cream in a bowl until well mixed.
7. Add 1/3rd at a time to the soup until the desired thickness.
SIDENOTE: This works just as well in the crockpot! Add all ingredients and cook on LOW for 7 hours! Perfect!
Indulge in a harmony of flavors with every bite of our tantalizing shrimp and grits.
Picture this: plump, succulent shrimp delicately nestled atop a bed of creamy, velvety grits, infused with just the right amount of savory spices to awaken your taste buds. Each mouthful is a harmonious blend of rich, buttery goodness and the subtle sweetness of fresh seafood, creating a culinary experience that dances on the palate. Welcome to a world where comfort meets sophistication, where every spoonful tells a story of Southern charm.
½ Cup diced spicy sausage (optional) This is something I had around, so I decided why not!
1 small filet of fish (optional) This is my spin on this dish!
Instructions:
Start by preparing the grits. In a medium saucepan, bring the chicken stock and milk to a boil over medium heat. Slowly whisk in the grits, reduce the heat to low, and cover. Let the grits simmer, stirring occasionally, for about 20-25 minutes or until thickened and creamy. Season with salt and pepper to taste, then stir in the butter until melted. Remove from heat and keep warm. Or to save time, mix everything in a microwavable bowl and cook for about 10-15 minutes, depending on your microwave.
While the grits are cooking, prepare the shrimp. In a large skillet, heat the olive oil over medium heat. Add the minced garlic and sauté for about 1 minute until fragrant. Add the chopped onion, and cook until softened, about 3-4 minutes.
Add the diced tomatoes to the skillet and cook for another 2 minutes.
Add the spicy sausage if using.
Season the shrimp with Cajun seasoning, salt, and pepper. Push the vegetables to the side of the skillet and add the seasoned shrimp. Cook the shrimp for 2-3 minutes on each side until pink and cooked through. Mix them in with the vegetable mixture.
Season your fish with the same seasoning. In the same pan, add the fish and cook for 2-3 minutes per side. Take out and set aside.
To serve, spoon the creamy grits into bowls and top with the cooked shrimp and vegetable mixture. Garnish with chopped parsley.
Add the fish perfectly right on top.
Can you say yum? Yes, please! And, when you get comments like “That’s mind-blowingly yummy” it makes you want to make this often!
Oh, and this will pair well with my homemade bread recipe, you can find that here
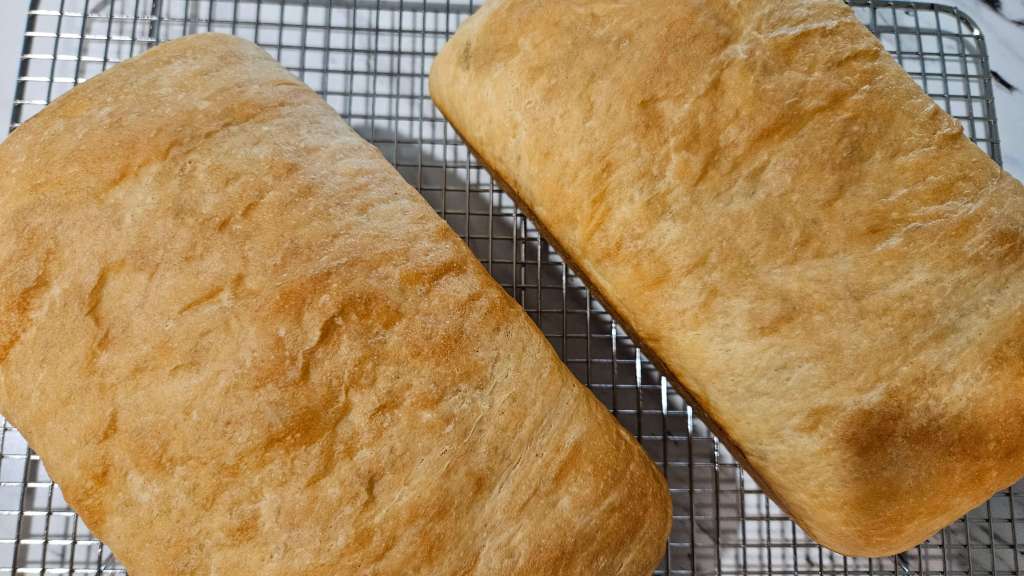
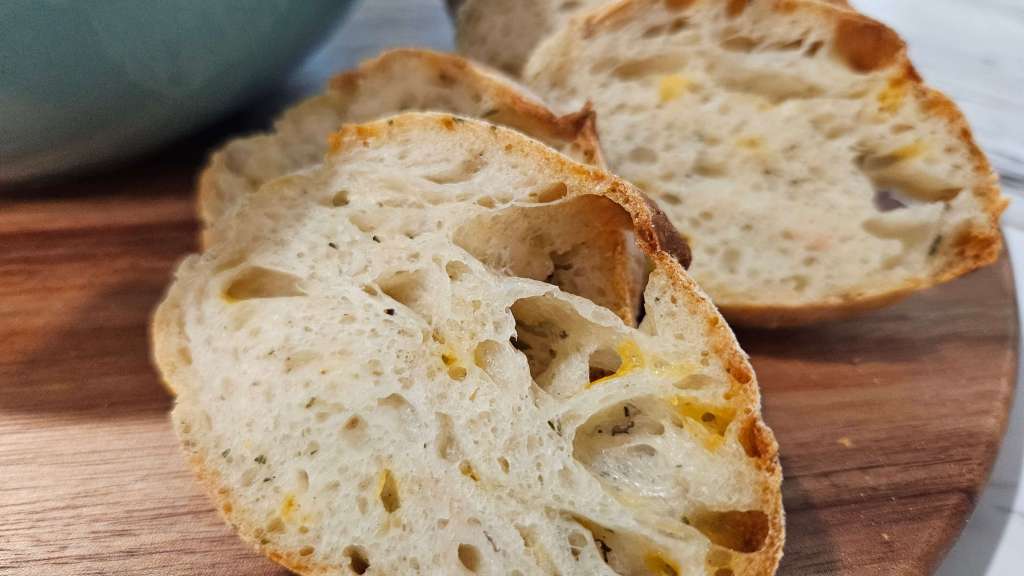
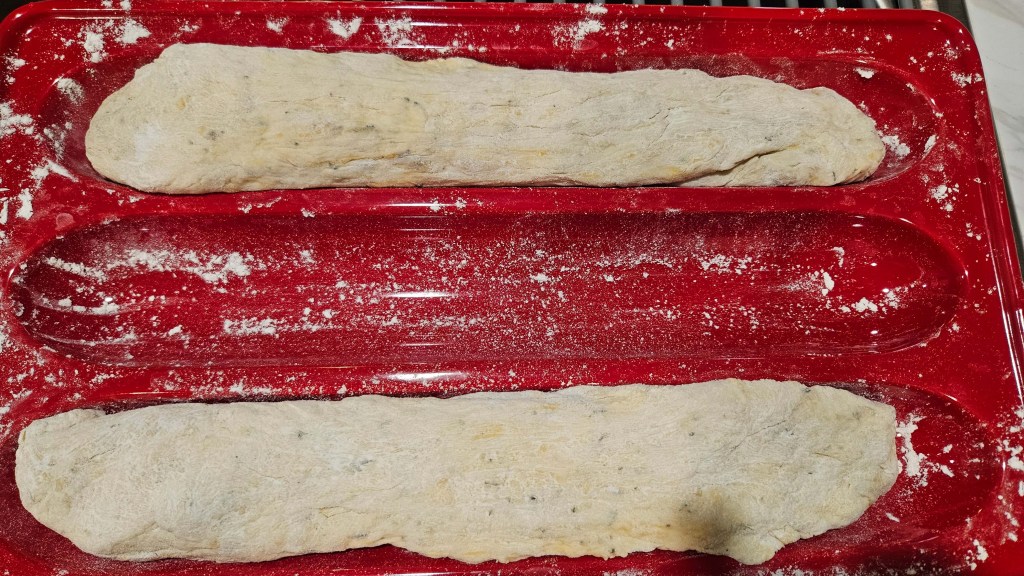
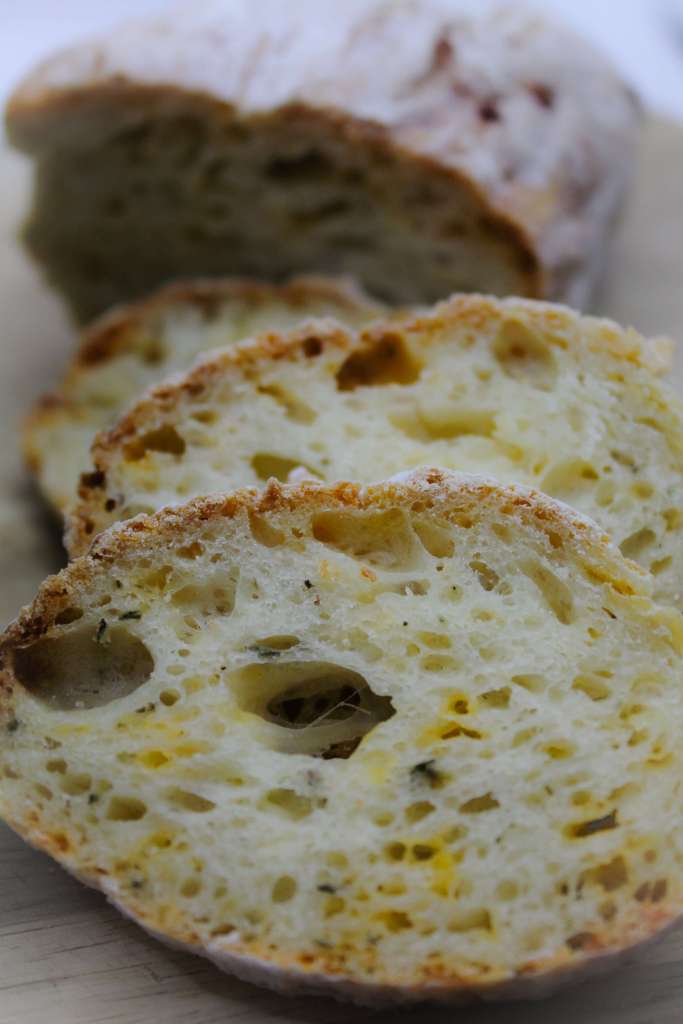
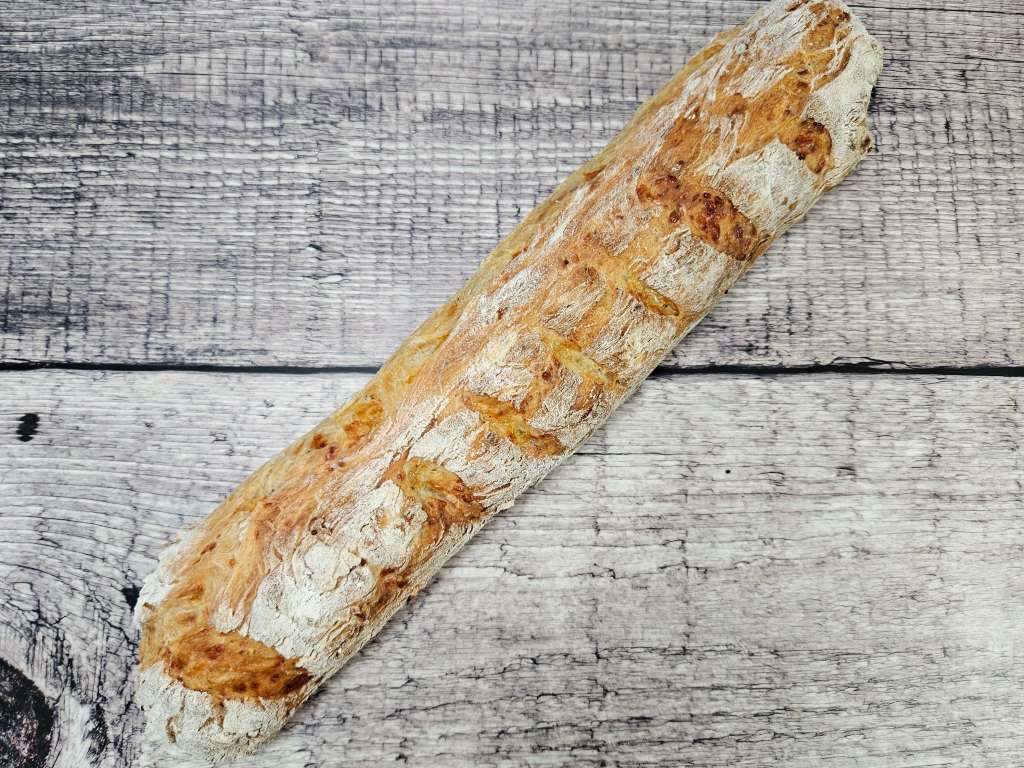
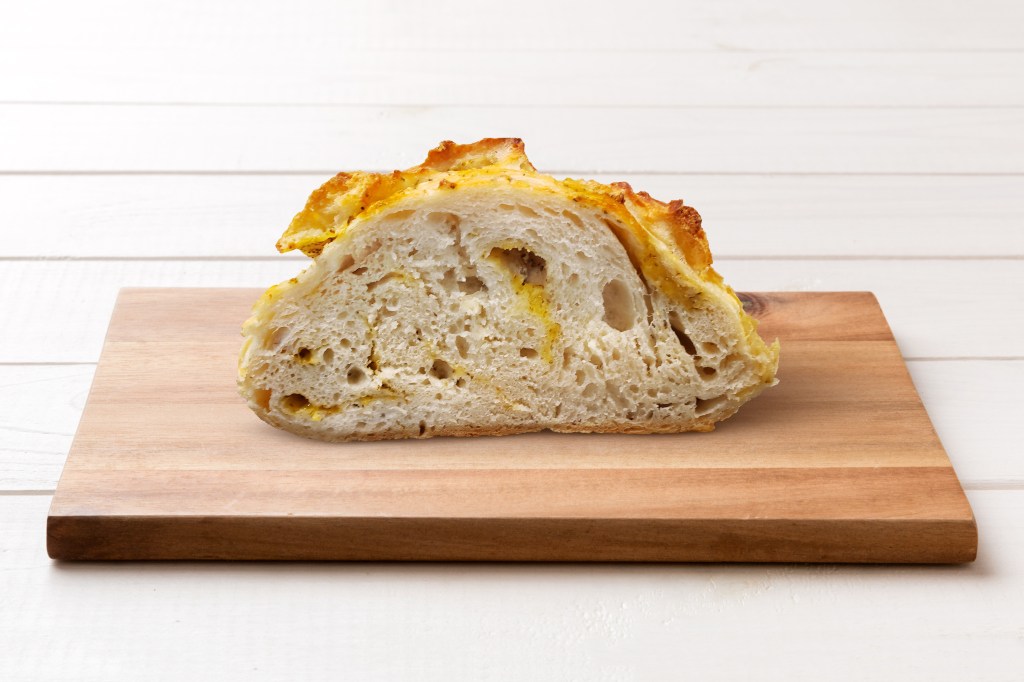
Making homemade fresh bread has never been so easy! This is by far the best and easiest no-knead bread I’ve ever made, and trust me, I’ve made a lot of bread over the past several months. I’ve not had much luck with the recipes that I’ve tried, but I’ve been tweaking and experimenting, and let me just say, wow, it’s incredible!
This recipe is simple; you just mix the ingredients and let it sit in a bowl for 3 to 18 hours. I left mine anywhere from 6 to 10 hours before. This is a very flexible recipe and should help with the busy schedules we tend to have!
There are only 4 main ingredients for this recipe, plus the cheese and herbs of course!
Flour – I actually used bread flour, but all-purpose will work too!
Salt – Don’t forget this one!
Active Dry Yeast – you don’t need much, and it’s important to make sure your yeast isn’t expired!
Hot Water – Between 95°F- 110°F
Cheddar Cheese – You can use whatever cheese you like, but I prefer cheddar cheese, yummy!
Herbs – I used rosemary and thyme in mine, but you can use what you prefer. You really can’t go wrong here.
Here are the ingredients that you’ll need:
3 Cups – Bread flour or All purpose flour (I used bread flour) (plus some for dusting)
2 Tsp. – Salt
2 Tsp. – Dry active yeast
1 ¾ Cups – Warm water 95F-110F
1/2 – 1 Cup – shredded cheddar cheese (Optional) I’ve made this recipe with or without it
1 Tsp. – Thyme (more or less, depending on your taste) (or your choice of herbs)
1/2 Tsp. – Rosemary (more or less, depending on your taste) (or your choice of herbs)
Here are the steps to make this no-knead cheese and herb bread.
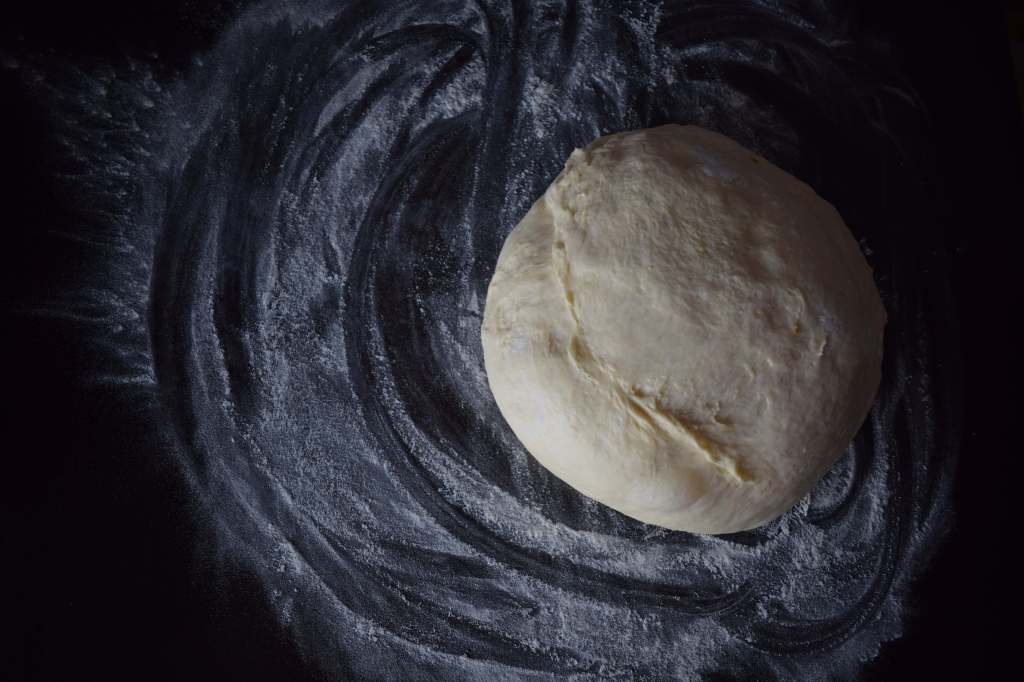
Step one: In a large bowl stir together flour, salt, cheese, rosemary, and thyme. Give it a quick stir and then add the yeast. (Salt slows down the yeast, so I wouldn’t have them in direct contact) Add in the water and mix thoroughly. The dough should be sticky.
Step Two: Cover the bowl and let it sit on the counter to rest for 3-10 hours or for up to 18 hours. You want the dough to double in size and start to have small bubbles on top.
Step Three: Once your dough has rested, place your Dutch oven in the oven to preheat at 450F
Step Four: While your Dutch oven is preheating, flour your work surface and remove the dough from the bowl. Shape into a ball, put onto some parchment paper, cover with a towel, and let rest until the oven is ready.
Step Five: Once the oven is ready, place the parchment paper with the dough into the Dutch oven, using a knife, make a slice on the top of the dough ball. This will help it expand, plus it makes it look so much nicer! Cover and bake for 30 minutes
Step Six: After 30 minutes, remove the top from the Dutch oven and bake for another 15 minutes.
If you don’t have a Dutch oven, do not worry! Just place a pan of water at the bottom of your oven to create a steamy environment. Use a cast-iron pan or a ceramic heat-proof dish. After 15 minutes, take the pan of water out and let it continue to cook until golden brown. ENJOY!
There are 3 different ways to tell if your bread is done.
Using a thermometer, most bread is done when the internal temperature reaches 190F
Give the bottom a few taps; if it sounds hollow, it’s done.
Color. The crust, for the most part, should be dry and firm, and a deep golden brown color. If it’s still rather pale, give it a few extra minutes.