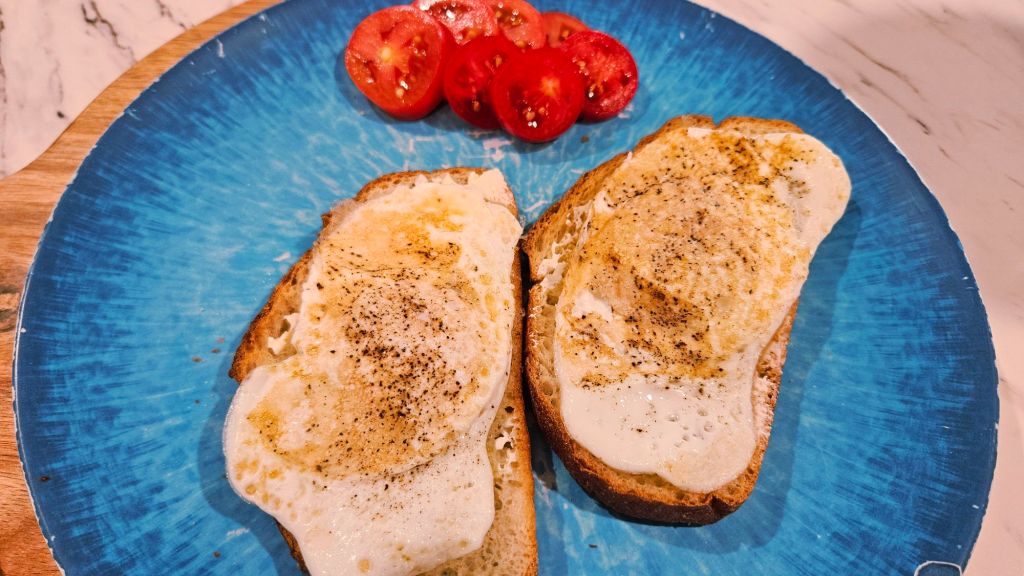
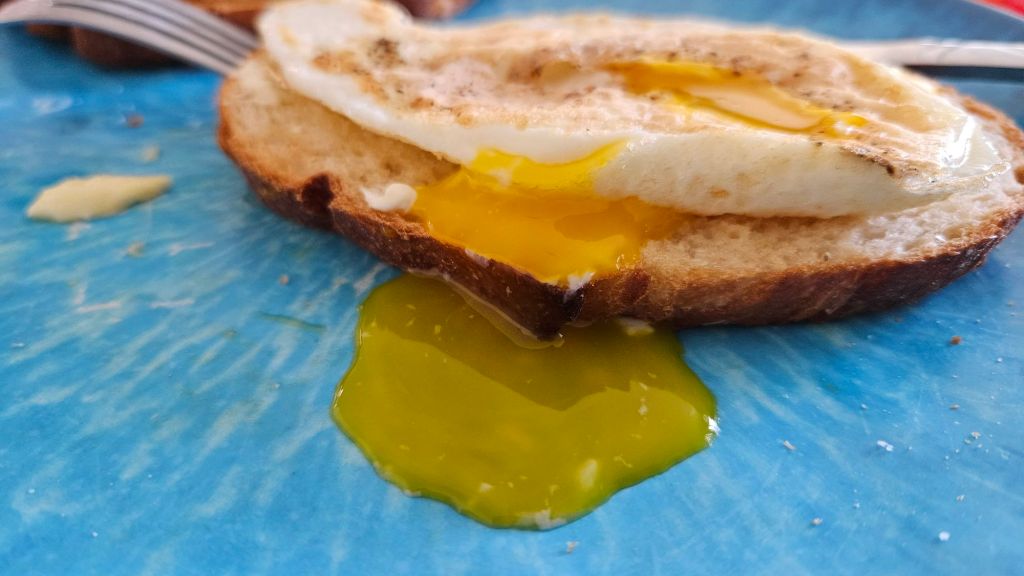
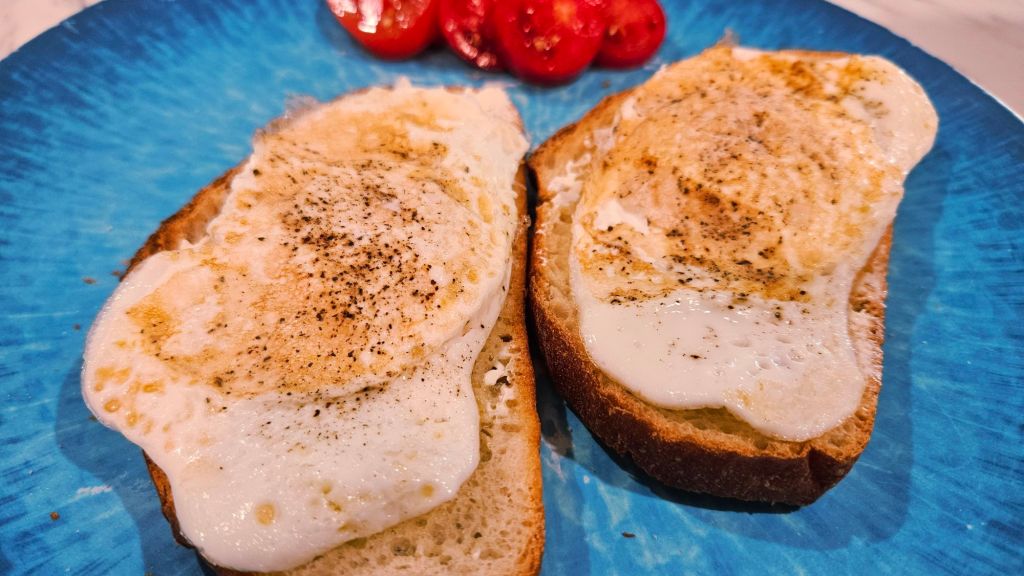
There’s something so comforting about a simple lunch of eggs over easy on toast. The golden yolk, just runny enough to spill over the warm, crispy bread, creates the perfect balance of richness and crunch. It’s a humble meal, yet it feels like a little moment of luxury in the middle of the day—quick to make, deeply satisfying, and always cozy. I even added some tomatoes from my garden!
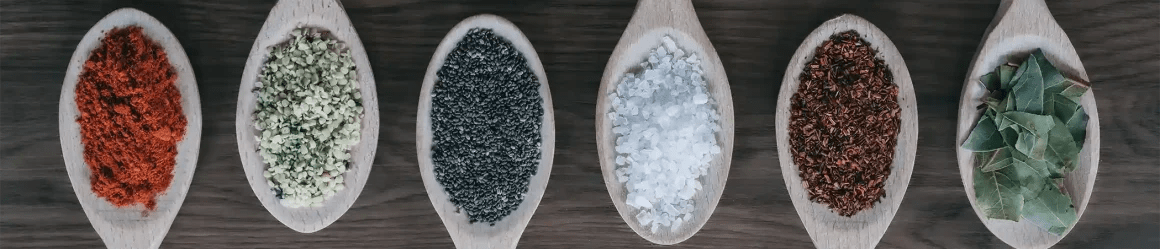
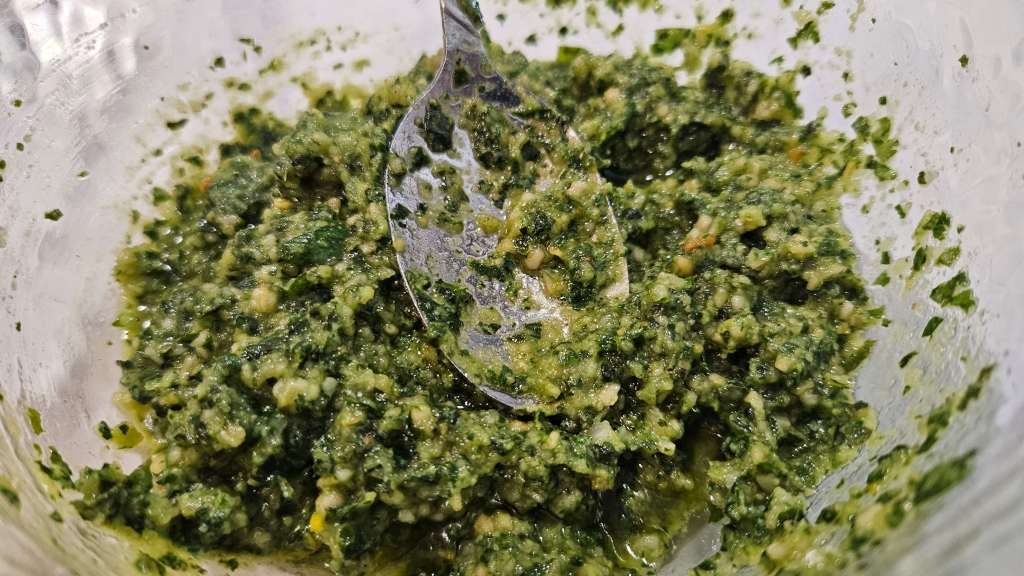
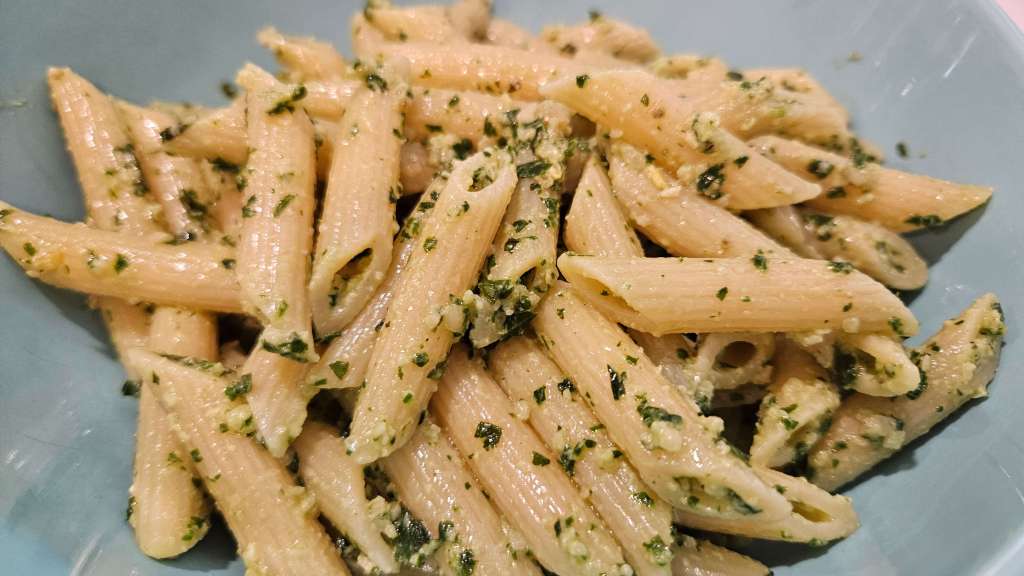
There’s something deeply satisfying about stepping into your backyard, brushing your fingers through a tangle of basil leaves, and harvesting the ingredients for your next meal. Homemade pesto is one of those simple pleasures that turns fresh, everyday ingredients into something extraordinary. With just a handful of garden-fresh basil, a clove or two of garlic, toasted pine nuts, a good amount of olive oil, and a sprinkle of Parmesan, you can create a vibrant, aromatic sauce that elevates everything from pasta and sandwiches to grilled veggies and even some nice bread. You can find my recipe for that here.
This is my favorite way to make pesto—simple, fresh, and bursting with flavor. Whether you’re swimming in basil from a thriving garden or just picked up a bunch from the farmers market, this recipe is a delicious way to put it to good use. It’s quick to make, easy to tweak, and endlessly versatile.
Ingredients:
2 cups fresh basil leaves (packed) (Or more if you love Basil, like me!)
1/2 cup grated Parmesan cheese
1/2 cup extra virgin olive oil
1 cup pine nuts (toasted)
3 garlic cloves
Salt and freshly ground black pepper, to taste
A squeeze of fresh lemon juice for brightness
Instructions: Toast the nuts (optional but recommended): In a dry skillet over medium heat, toast the pine nuts for 2–3 minutes, stirring often, until golden and fragrant. Let them cool slightly.
Blend the base: In a food processor or high-powered blender, combine the basil leaves, garlic, and toasted nuts. Pulse until the mixture is coarsely chopped.
Add cheese: Add the grated Parmesan and pulse a few more times to combine.
Stream in the oil: With the processor running on low, slowly pour in the olive oil until the pesto reaches your desired consistency—smooth but still a bit textured. You may need to scrape down the sides once or twice.
Season to taste: Add salt, pepper, and lemon juice (if using) to taste. Give it one final blend.
Use or store: Use immediately, or transfer to a jar. To store, cover the surface with a thin layer of olive oil to prevent browning and refrigerate for up to 5 days. You can also freeze pesto in ice cube trays for easy, single-serving portions.
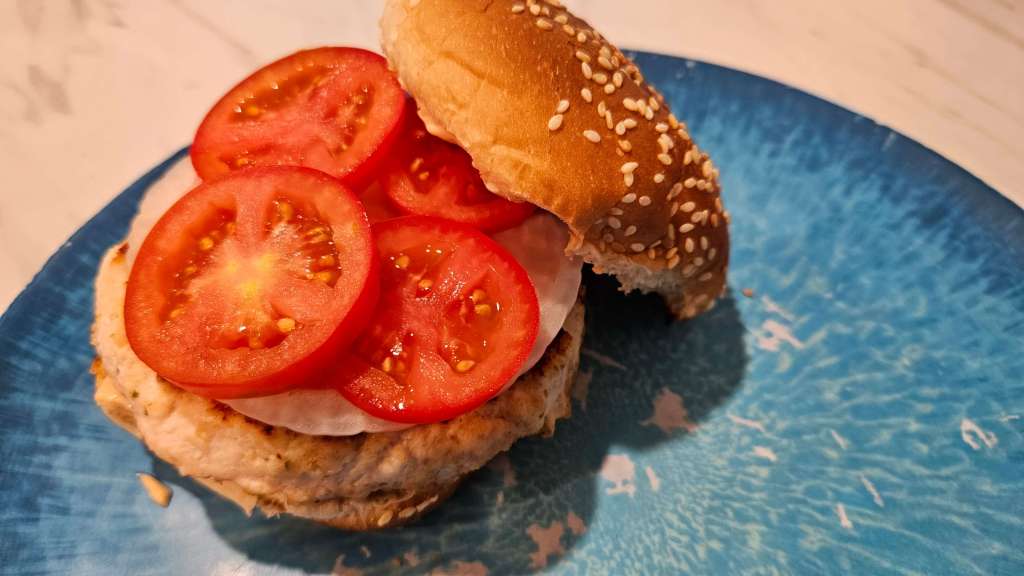
These chicken burgers are the kind of food that makes you wanna do a happy dance mid-bite. Picture this: a juicy, perfectly seasoned chicken patty, topped with slices of fresh tomato (these are actually from my garden!) and any other toppings that are so good, you’ll start questioning if you’ve been living under a rock your whole life. Pile on your favorite toppings, slap that burger on a soft bun, and suddenly you’re a gourmet chef without even trying. It’s the burger that makes everyone at the table jealous, even if they’re not admitting it. They’re so good, you’ll be looking for excuses to make them again — “Oh, it’s Tuesday? Guess it’s chicken burger night!”
Ingredients:
1 lb ground chicken
1/3 cup breadcrumbs
2 tablespoons mayonnaise (this keeps these so moist)
1 tablespoon olive oil (for cooking, if needed. I don’t use it)
Optional Toppings:
Lettuce
Tomato slices
Pickles
Red onion slices
Cheese (Swiss, cheddar, or provolone)
Burger buns
Mayo, ketchup, mustard, or your favorite sauce
Instructions:
Mix the Ingredients: In a large bowl, combine the ground chicken, breadcrumbs, mayonnaise, garlic, onion, parsley, Dijon mustard, paprika, salt, and pepper. Mix gently until just combined — avoid overmixing.
Shape the Patties: Divide the mixture into 4 equal parts and form into burger patties. Lightly wet your hands if the mixture is sticky.
Cook the Burgers: Heat the olive oil in a skillet or grill pan over medium heat. Cook the patties for about 4-5 minutes on each side, until golden and the internal temperature is 165°F (74°C).
Build Your Burger: Toast your buns if desired. Place a patty on each bun, then add your favorite toppings and sauces.
Serve: Enjoy immediately with your favorite sides like fries, salad, or sweet potato wedges!
And there you have it — the ultimate chicken burger that’s not only a crowd-pleaser but also ridiculously easy to whip up. Whether you’re grilling for friends, meal prepping for the week, or just craving something delicious, these burgers are sure to hit the spot. So, grab those ingredients, fire up the skillet or grill, and get ready to enjoy a burger that’s anything but basic. Trust me, once you taste these, you’ll never look at a boring old patty the same way again. Happy cooking, and your taste buds will thank you!
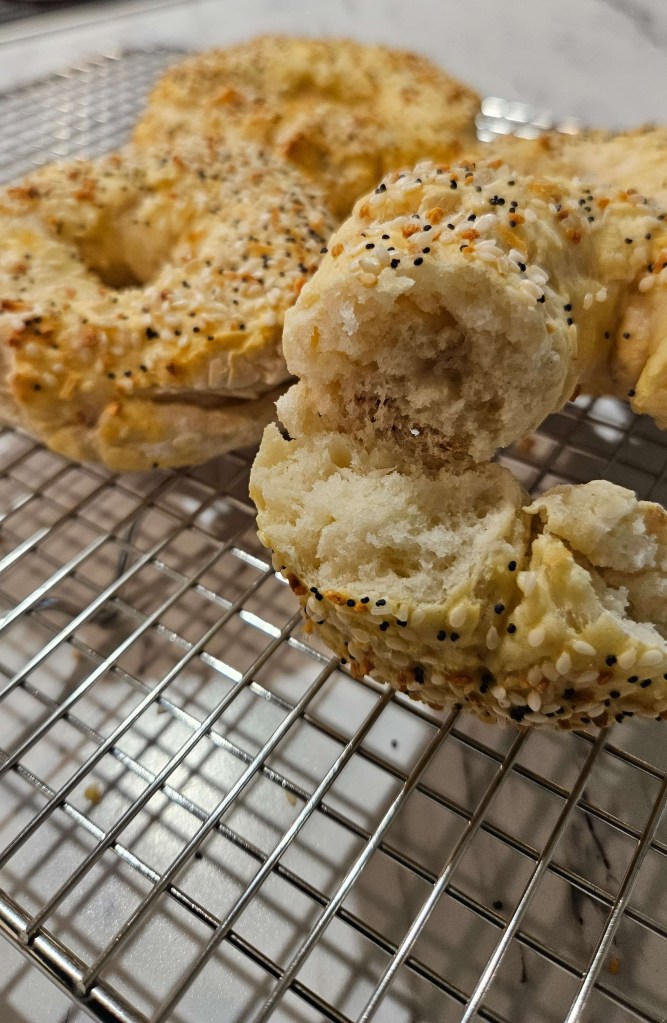
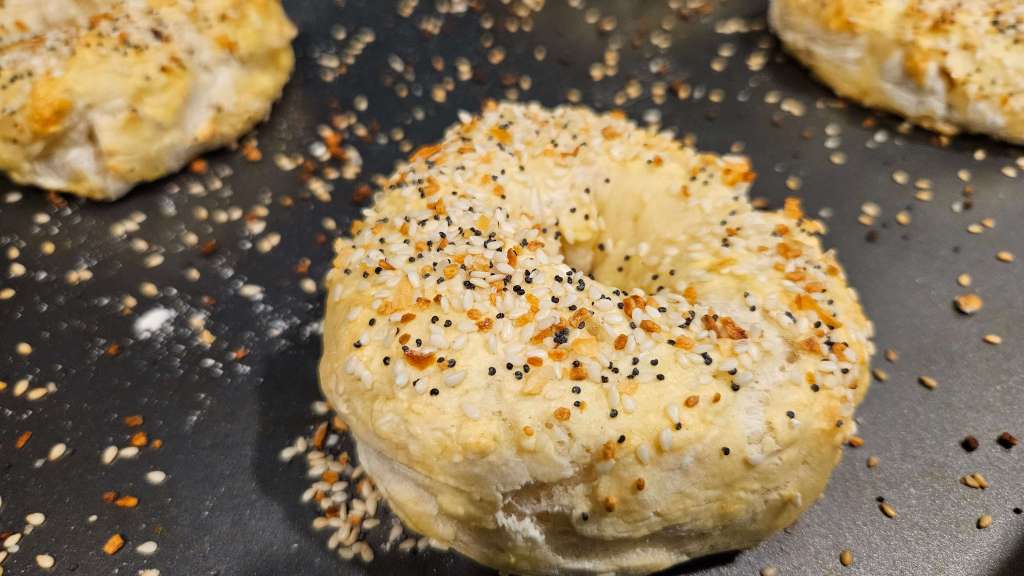
Easy and foolproof 2-ingredient bagel recipe made with Greek yogurt and flour – That is it!
Imagine biting into a warm, freshly baked bagel that’s perfectly golden on the outside and delightfully chewy on the inside – all made with just two simple ingredients! It sounds too good to be true, right? But with this easy, no-fuss recipe, you can create homemade bagels in a fraction of the time it takes to go to the bakery. No yeast, no fancy equipment, and no long hours of kneading—just two basic ingredients that come together to form a dough so simple, yet so satisfying. If you’ve ever wanted to enjoy the magic of homemade bagels without the hassle, this is the recipe for you!
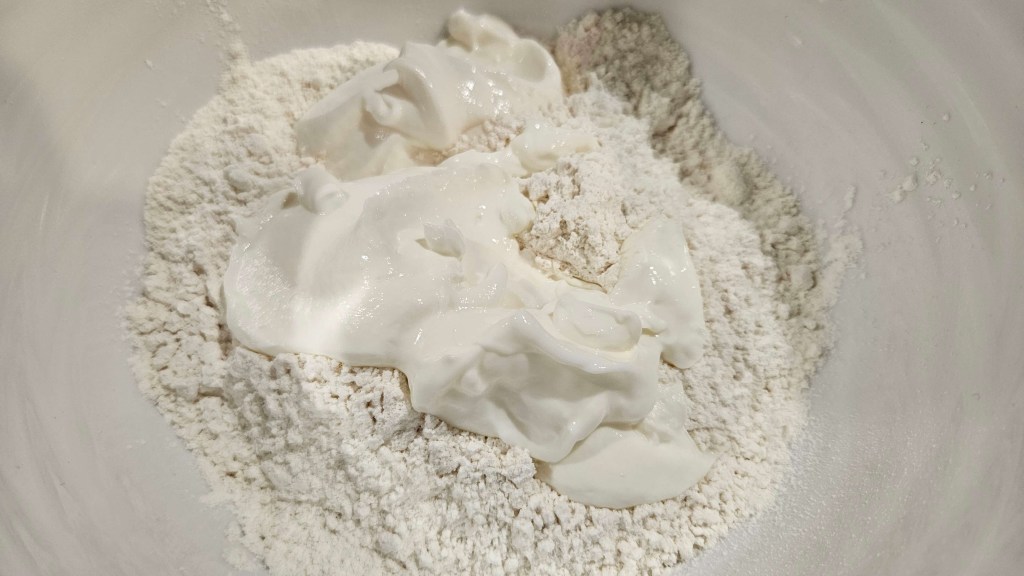
Bagel ingredients: 1 ¼ Cups of Self Rising Flour 1 Cup Plain Greek Yogurt
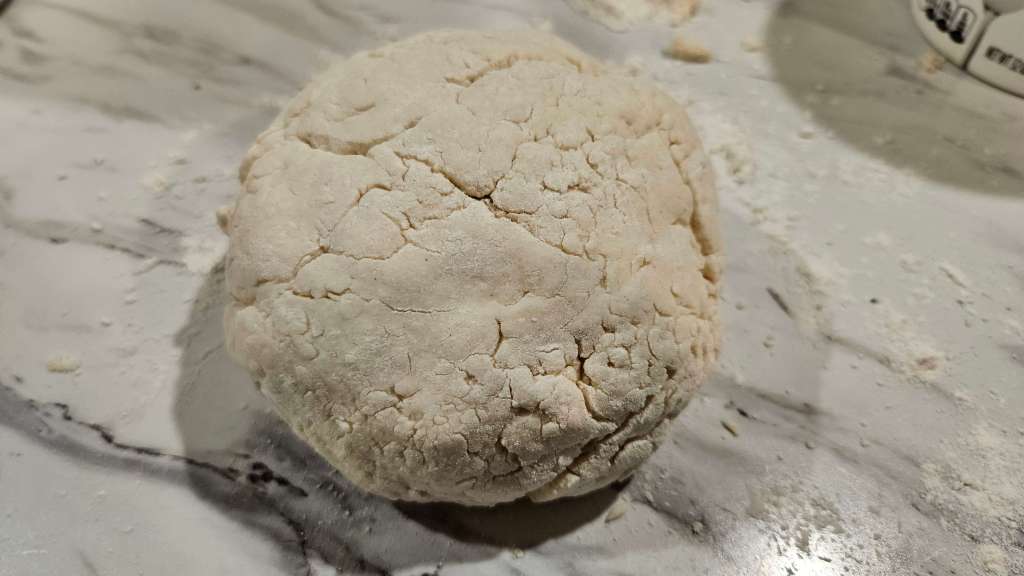
Instructions: 1. Preheat the oven to 180C/350F. Line a baking tray with parchment paper and set aside. 2. In a large mixing bowl, combine your flour and Greek yogurt and mix well, until fully combined and a ball of dough remains. 3. Lightly grease a kitchen surface with extra flour. Place the ball of dough on top, and top with a little extra flour. 4. Slice into 4 even pieces. 5. Use your hands to roll the dough into a thin, sausage shape. Join both ends of the dough to form a bagel shape. Place on the lined tray and repeat until 4 bagels are formed. Lightly brush the tops of each bagel with either butter, egg, milk or water. Sprinkle the seeds on top. (Optional) 6. Bake the bagels for 22-25 minutes, or until golden brown. Remove from the oven and allow to cool completely.
Whether you enjoy them plain, with your favorite spread, or piled high with toppings, these bagels are a perfect reminder that sometimes the simplest recipes are the most rewarding. So the next time you’re craving a fresh, warm bagel but don’t have the time or patience for a complicated recipe, remember this easy two-ingredient trick—because homemade bagels have never been easier or more satisfying!
NOTES:
To store: Place cooked and cooled bagels in a ziplock bag. Bagels generally keep fresh for at least 5 days. You CAN keep them at room temperature, provided you eat them within 3 days.
To freeze: Either place bagels in ziplock bags individually or all of them together in one bigger bag. Frozen bagels will keep for 6 months.
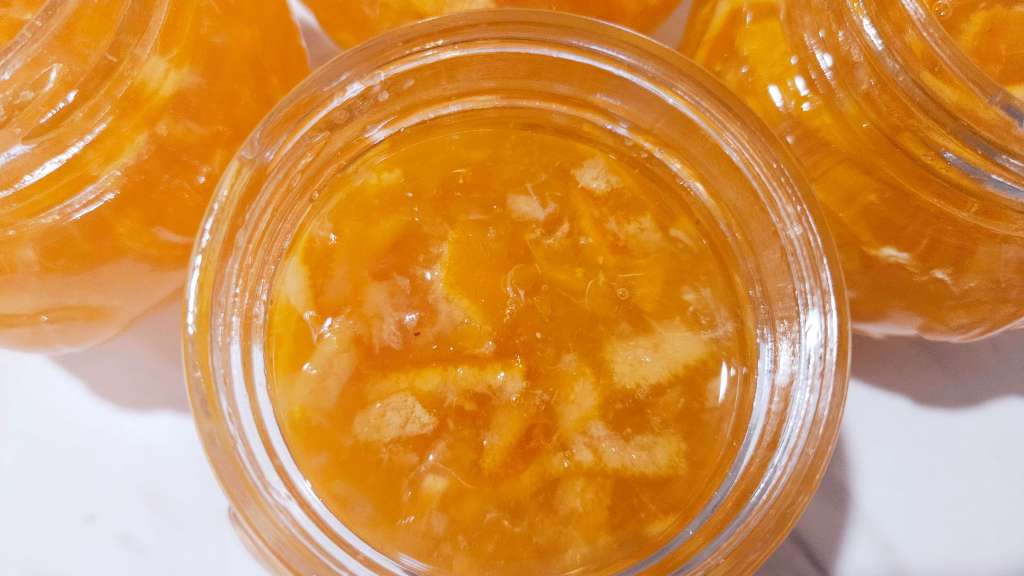
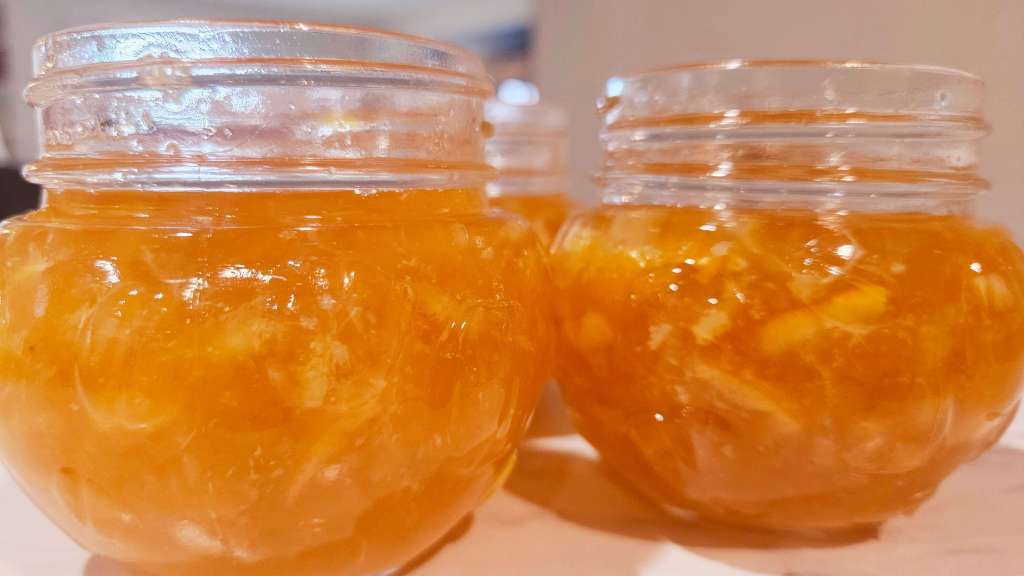
Imagine the perfect balance of sweet and tangy in every bite—a luscious spread that brightens your morning with its zesty citrus punch. Orange marmalade isn’t just a preserve; it’s a burst of sunshine in a jar, with its vibrant color and bold, refreshing flavor. Whether slathered on toast, swirled into yogurt, or used in cooking, this timeless preserve is a taste of nostalgia with a modern twist. Ready to awaken your taste buds?
Ingredients: (Yeah, it’s that simple)
1 lb mandarin oranges about 5-6 small oranges
2 cups water
3 cups sugar divided in recipe
Instructions:
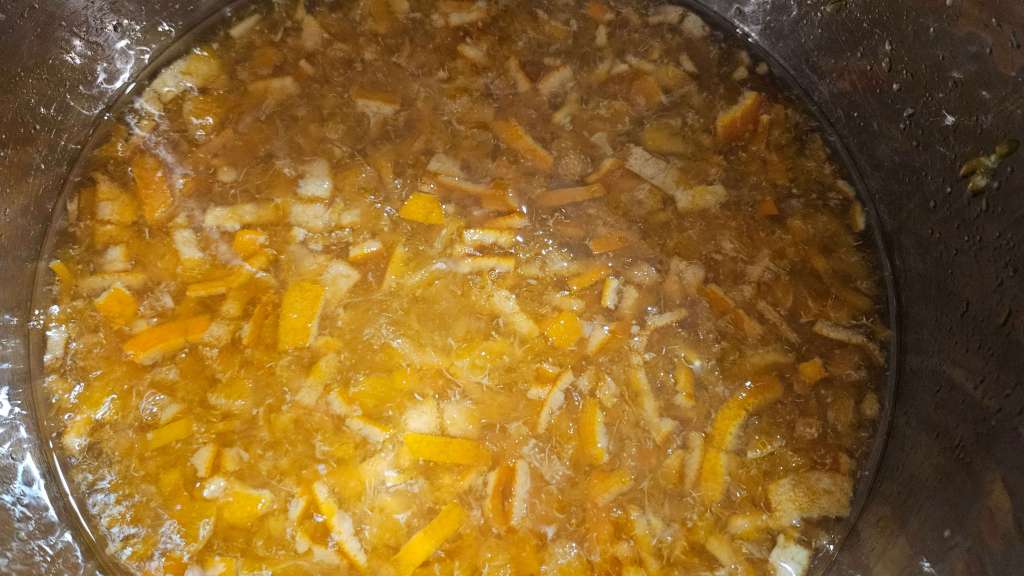
Cut the stem off of the mandarins and slice the mandarins in half. Slice each half into slices about ¼” thick. Throw them in the inner pot of your pressure cooker
Add 2 cups of water and 2½ cups of white sugar. Stir.
Put the pressure lid on the Instant pot and turn the valve to seal. Select high pressure for 10 minutes. When the time is up, allow the pot to naturally release its pressure. This takes about 25 minutes.
Open the lid and turn on the sear/sauté on high. Bring the mixture to a boil and add in the remaining ½ cup of sugar. Bring back up to a boil and boil until the mixture reaches about 221°F-223℉ (105-106°C). This is important in order for your marmalade to set up. I usually stir occasionally during this process to avoid scorching. The best way to determine if your marmalade is done is by using a thermometer.
Once the orange marmalade has reached at least 221°F, turn off the heat and stir. Allow to cool and then ladle into jars and let them sit at room temp for 1-2 hours, then refrigerate for at least 4 hours to set up.
There’s something truly magical about the combination of peanut butter and chocolate, and Peanut Butter Blossom Cookies capture that perfect balance in every bite. With a soft, chewy peanut butter cookie base coated in sugar and topped with a Hershey’s Kiss, these cookies are an irresistible treat that’s both sweet and salty. Whether you’re baking for the holidays, a special occasion, or just because, these classic cookies are sure to please everyone around the table. Simple to make, yet full of flavor, Peanut Butter Blossom Cookies are the ultimate comfort dessert for any time of year!
Here are the ingredients you’ll need:
Nonstick cooking spray 2 3/4 cups all-purpose flour 1 1/4 teaspoons baking soda 1/2 teaspoon fine salt 1 cup smooth peanut butter 12 tablespoons (1 1/2 sticks) unsalted butter, at room temperature 1/4 cup vegetable shortening 1 3/4 cups packed light brown sugar 2 large eggs 1 tablespoon vanilla extract 48 to 60 chocolate kiss candies (depending on the size you make)
Directions
1. Adjust the oven racks to the upper and lower thirds and preheat the oven to 375 degrees F. Coat 2 baking sheets with cooking spray (I used my silicone baking mats)
2. Combine the flour, baking soda, and salt in a medium bowl. Set aside.
3. Beat the peanut butter, butter, and shortening in a large bowl with an electric mixer on medium-high until smooth, about 1 minute. Add the brown sugar and continue to beat until light and fluffy, about 4 minutes. Add the eggs and vanilla and continue to beat until incorporated. Add the flour mixture in two batches and beat on medium until incorporated.
4. Scoop out level tablespoons of dough, roll them into balls, and space about 2 inches apart on the prepared baking sheets. (You will need to bake the cookies in batches; allow the baking sheets to cool between batches.)
5. Bake until the bottoms and edges of the cookies are golden brown but the middles are still soft about 10 minutes. (The cookies will bake a bit after they come out of the oven). Indent the warm cookies with a chocolate kiss candy.
6. Allow the cookies to cool on the baking sheet for a few minutes and then transfer to a rack to cool completely.
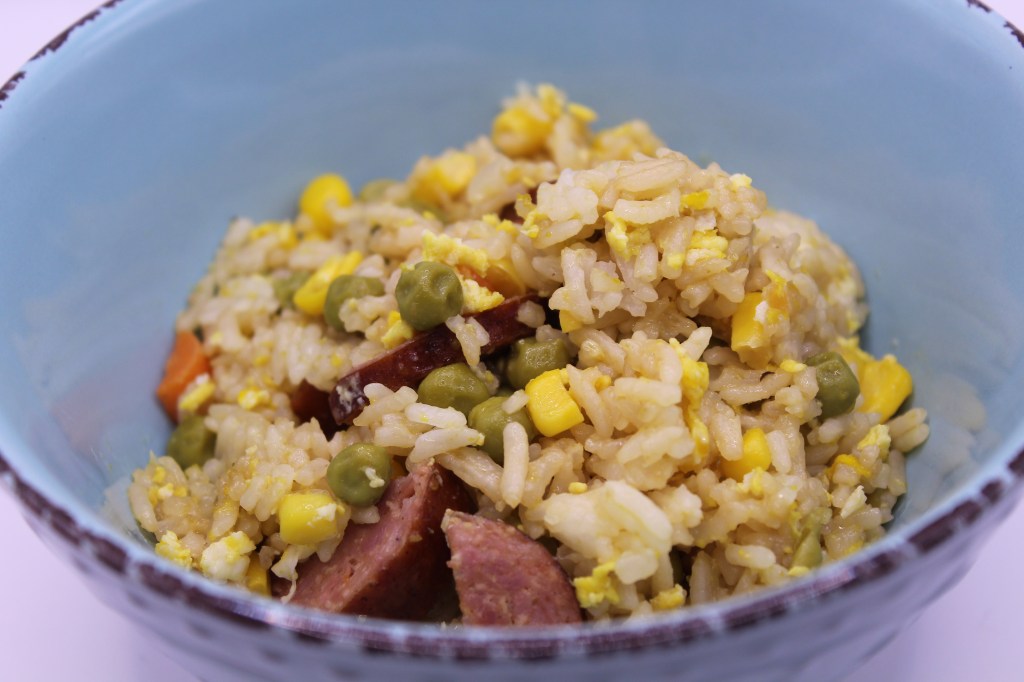
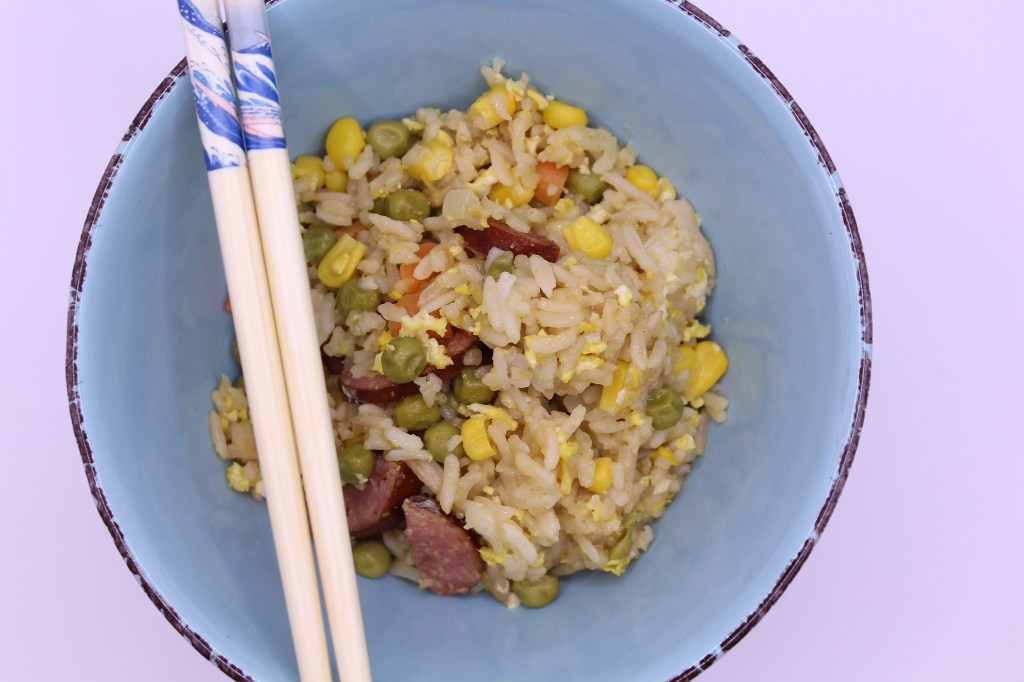
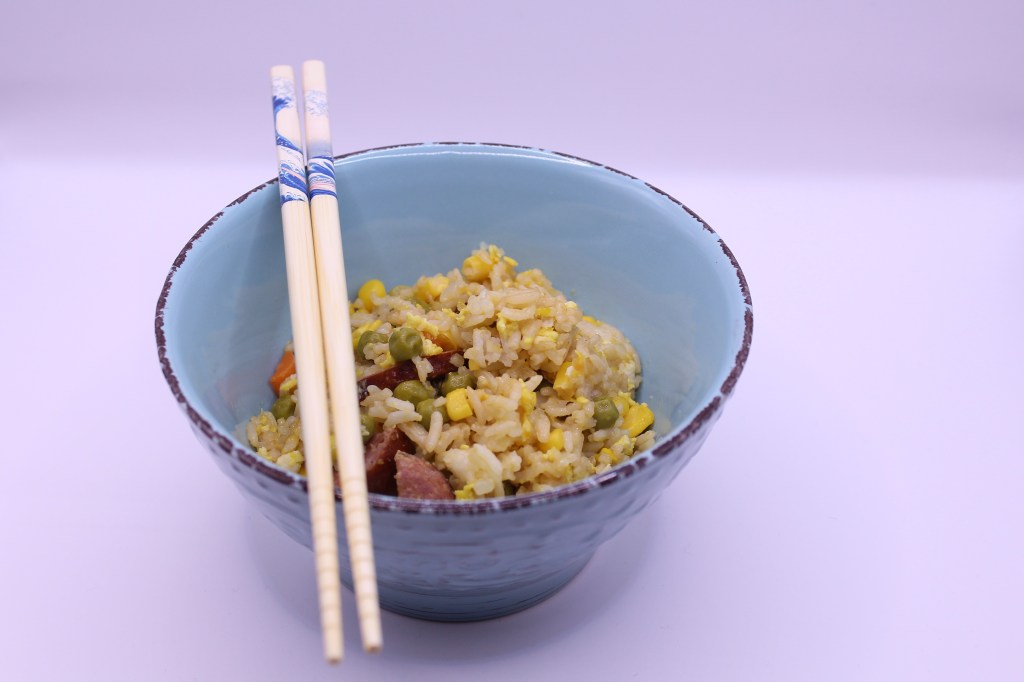
Have you been to those restaurants where they cook on a hibachi grill in front of you? The experience is always quite amusing and the food is normally so delicious. The rice is my favorite part of the food (gosh, I love rice, feed me NOW!) So, I’ve created my own hibachi fried rice. Now you can save all the money and make it at home and I assure you, it will taste even better. Trust me! The great thing about this recipe (and pretty much ANY other recipe) is that you can take out anything you don’t like and add some stuff that you do!
Here is the basic list of ingredients you’ll need: You could just use a small bag of frozen mixed vegetables on the vegetables. I personally don’t care for the taste of frozen peas or carrots, however, that would be a little easier!
2 Cups White Rice (Rinsed) 2 Cups Cold water or broth ½ Cup Diced Carrots ½ Cup Corn ½ Cup Peas 1 small Onion 1 Cup Diced Andouille Sausage (optional) 3 (or more) Eggs (I added 4 as I love extra eggs in mine!) 4 Tbs. Soy Sauce (I used low sodium soy sauce) 2 Tbs. Sesame Oil Salt and Pepper to taste
Step 1: Rince the rice until the water turns clear. This should take about 1-2 minutes. Once finished add to the Instant Pot. DO NOT skip this step, if you do the rice will come out mushy.
Step 2: Add 2 cups cold water or broth.
Step 3: “Pressure cook” on high for 3 minutes, allow a 10-minute natural release. Once that’s done, do a quick release. Fluff the rice with a fork and transfer it to a bowl.
Step 4: Add 2 Tbs. Sesame oil to the pot. Add the onion, mixed veggies, and sausage(if you’re using it) Cook until veggies are tender.
Step 5: Move the veggies to one side and add the eggs, stir them constantly until they begin to scramble. Once the eggs begin to cook, mix them in with the veggies until they are done.
Step 6: Add the rice back in and stir until it’s mixed well.
Step 7: Add the soy sauce and stir until everything is evenly mixed.